Showing posts with label nails. Show all posts

Glitter Gradient Mermaid Nails

Sunday, 15 March 2015
No comments :

Hi lovelies,

I'm sorry I haven't been around recently, but as I mentioned briefly in my last post, I've just started uni and these past couple of weeks have been a bit of a blur of organisation, finding my way around, buying books and getting lost on campus. Also, my workload is way more than I was expecting so I don't know how well I'm going to be able to manage uni, my job and running this blog. But never fear, there is no way I'm going to be leaving this blog. Although, I think I may have to revisit my New Years resolution about publishing at least 8 posts a month because obviously, I didn't manage that last month!

But, enough blathering on my part! On to today's nails!


I have obviously been on a massive mermaid appreciation phase lately, as both my my last mani's here have been mermaid themed ones! But what can I say? My mermaid style has exponentially increased since I dyed my hair blue and my new blue and iridescent purple lipsticks have arrived and I'm loving it all.

Although, the only problem is that while I got lots of great pictures of my gorgeous gradient base, I only got one usable picture of my finished look, which kind of sucks. But, never mind, I loved this look way too much to let that deter me from posting this design!

Teal Mermaid Nails

Thursday, 19 February 2015
No comments :

Hi everyone,

So, you'll be glad to know that I'm back to slightly erratic posts again after a brief stint at actual consistent posting. However, I'm quite proud that at least while things have been a little erratic, at least there have been no extended, unexplained absences.

I've just been feeling a bit stressed out and anxious recently due to the fact that I'm starting uni next week and I've been really tired all this week so all has compounded to me not really having much motivation. Although, it hasn't yet got to the the 'hiding out in my room doing nothing but reading Avengers fanfiction' stage so I'm by my standards, I'm managing all right.

Basically it was only because I really loved this design that I ever managed to photograph it and get it up.


If you're following me on instagram, you'll know I recently suffered a really bad nail break and had to chop off my baby claws, which was a sad time all around and explains the suddenly shorter and rounder nails.

As much as I loved my longer nails, I do feel (after an acceptable grieving period, of course), that it probably was time for me to have a change and cut them shorter again. They are feeling a lot healthier and I was able to cut off all the stained and peeling bits so they look super duper healthy. Yay!


Valentine's Day Heart Tips

Friday, 13 February 2015
No comments :

Hi lovelies,

Here is my other Valentine's Day look for this year, and I'm disappointed it didn't come out as well as I'd hoped it would. I love the idea of using your nail shape as part of your design and so I was thrilled that my new pointy shape was going to lend itself so well to hearts.


However, it turns out that painting little hearts is a lot harder than it looks... I had to redo so many nails and I was so close to throwing in the towel completely many times. But, I persevered and by the time I got to the last couple of nails, I was beginning to like them again, warts and all.

Valentine's Day Leopard Nail Art

Thursday, 12 February 2015
No comments :

Hello there my lovelies,

Here's my first Valentine's Day look for this year. Considering I'd never a Valentine's look before (I know! Shock horror!) I thought this one came together quite well.


These nails all came about after seeing this picture on instagram and I fell in love with the pink and red leopard print. It (thankfully) gave me the inspiration I was lacking for my Valentine's Day mani.

However, I did my right hand first, as per usual, and added the pink dots, but then wasn't sure whether I liked them or not, so I left them off when I did my other hand. Even now, and I've been wearing them for close to two days, I still don't know which hand I like better. So I thought I'd post both and ask you for your opinion. What do you think? Which hand do you think is better?


A Nuggle's Guide to Nail Art Terms | Part 2

Saturday, 7 February 2015
No comments :

Hello there!

Today I'm back with my second and final part to my Nuggle's Guide to Nail Art Terms. If you missed the first, or wish to re-read it, your can find it here.

Otherwise, I'm back with my sister Tess and her boyfriend Juwan to quiz them about various nail related terms. When we left them last time, Tess was on a score of 7, out of a possible 15 and Juwan scored 5, so let's see who comes out on top!


HG
J: Hungry Jacks? Hungry Goblin? Definitely hungry goblin.
T: High definition? Oh wait that's a D.....
Well it's definitely not Hungry Goblin... HG is actually an abbreviation for Holy Grail, which is a product/s that is the best ever, in your opinion, something you swear by and would recommend to others (see my HG nail products here, if you're interested).

Holo
J: Something see through. Like a see through nail polish.
T: The ones that the ILNP brand do. The ones that change colour? Or are really sparkly?
Yup, these polishes are super-sparkly. Holo (or holographic for long) polishes have pigments in the them that means when you hold them in the light, you can see a rainbow of different colours. And yes, ILNP do amazing holos.

Jelly
J: Squishy. Jelly polish.
T: Gel nail polish. Do you call that jelly for short?
While calling gel polish jelly actually kind of does make sense, a jelly is a type of polish that is rather sheer and when built up of a couple of coats, has a transparent quality and squishyness about it that is reminiscent of jelly, so well done to Juwan for that one.

Lemming
J: White nail polish, like a lamington. And with yellow in it too.
T: Sounds like a fish.
No and no. A lemming is a polish that you really, really want, and can often be hard to find. And no, I have no clue why it's called a lemming.

Birefringence and Masquerade by ILNP (also, sorry for the dodgy white balance...)
Multichrome
J: Multiple colours of chrome.
T: More than two colours in one polish, otherwise it would be a duochrome. Ha I'm such a technical genius. (looked incredibly pleased at her knowledge)
To be honest, I don't know how widely used this term is. For me, a multichrome is different to a duochrome in that a duochrome has predominantly two colours, whereas a multichrome has a much fuller colour spectrum, like the two above. So yes, exactly what Tess said.

Negative Space Half Moon Mani

Tuesday, 3 February 2015
No comments :

Hi lovelies,

These nails are ones I did a couple of weeks ago, when I was still working out the kinks in my new photography set-up and so the photos are a little off. But, I did really like this design, so I'm still going to post it. It's also my first attempt at a negative space nail art design and I thought it was important to record that. On a side note, check out this branching out in new techniques - first my half moon mani and now negative space and half moons together!


I also couldn't decide whether I liked it better glossy or matte, so I thought I'd post both. What do you think? I think having it matte makes the lines and the overall design look crisper and neater, but there is a reason why glossy nail polish is so well-loved..

A Nuggle's Guide to Nail Art Terms | Part 1

Thursday, 29 January 2015
No comments :

Hi lovelies,

So, I was talking to one of my non-polish-obsessed friends the other day and it was about halfway through the conversation (aka my polish-themed monologue) that I realised she staring at me with a rather bemused and confused expression and then informed me that she really had no clue what half of my word meant. Upon reflection, I realised I maybe had put a few too many jargon-y and nail-specific terms into our (my) discussion.

And since this is not solely a nail art blog, I came to thinking that maybe some of you, my dear readers, also do not know some of the terms I throw around on this blog. So, here is my dictionary/guide of nail terms for nuggles.

For your (and my) amusement, and as a comparison, I've asked a complete nuggle and a polish liker, but not enthusiast, to give their opinions on what each terms means. I know that the common practice in this instance is to use you boyfriend for the nuggle, but since I don't have one I've had to borrow my sister's boyfriend instead. And, as a bit of fun, I've included my sister Tess as well and have decided to have a little competition, even though I think Tess is at a distinct advantage, seeing as she does live with me and she also paints her nails fairly regularly but oh well.

So, without further ado, let me extend a welcome to Tess and Juwan and let's get cracking!


Base Coat (what it is and does)
J: Primary layer.
T: Clear varnish before colour. It's helps protect the nail and makes the varnish last longer.
Both got this pretty right. It's a clear coat of polish that is designed to protect the nail plate from staining and also to provide a sticky/tacky layer for the polish to adhere to in order to help it stay on longer.

Big 3 Free
J: ... Remover?
T: 3 big chemicals, I can't remember the names but they're pretty bad and if they're not in the polish then it's better.
Right on Tess! No, it's not remover, Juwan. If a polish is Big-3 Free it means it doesn't contain toluene, formaldehyde or dibutyl phthalate (DBP), which are some of the most nasty chemicals that can be found in nail polish. If your interested in reading more about the Big-3, Michelle from LabMuffin does a great series on them.

Bin Diving
J: .....
T: When your nail bends over? It dives over the edge??
I have to say, I did think this was fairly self-explaintory, but I guess not. Bin diving is when you go into a store and there is a massive box of nail polish and you have to dive and dig all the way through it to find the real gems (it's fun!)

Claws
J: Long pointy nails.
T: Long pointy nails, like stilettos and they're usually acrylic.
Perfect guys! Although alot of claws are acrylics, it's only because it takes a lot of dedication, perseverance and excellent genes to get your nails to that length.

Crackle
J: Bumpy texture?
T: When your polish starts to crack and chip off?
I'll be generous and give half points for Juwan for this one. Crackle refers to the finish of a polish and how it cracks when it dries, allowing you to see the colour underneath (it was also one of the two nail art trends I just can't manage to do - the other is water-marbling)


Cremes - Good to Grape by Sally Hansen and Mystique by Face of Australia
Creme
J: Texture. (I asked whether he was going to elaborate on that, but he declined)
T: Type of polish that's smooth and creamy
Nice work Tess - that's bang on the mark! Creme, like crackle, refers to the finish. Creme polish is your standard polish - it's got no shimmer, no glitter, no flakies, no nothing. It's just a smooth, even colour.

Australia Day Nail Art

Monday, 26 January 2015
No comments :

H lovelies,

So, it's the 26th, and that means it is Australia Day down here! It also means that I'm away for the long weekend and so if you're reading this, it also means I actually figured out how to schedule posts! So, I thought that I'd better do some appropriately patriotic nails for you (and we'll ignore the fact that I actually did these three days in advance) and instead we'll concentrate on how obnoxiously Australian these are...


Actually, in all honesty, they are not as obnoxious as I first thought they were going to be. Although, they are quite bad. I think it's all the yellow. Yellow is just not my colour, in any shape, shade or form and there is a reason why I only own one yellow nail polish out of my collection of about 120. And I only own this one because I need it for nail art.

That yellow is also much brighter in real life and the green is also more rich. It's slightly less yellow than it appears in these pictures.


Coming up with a design for Australian nails that was not only obviously Australian but also straight forward, easy and quick and did not involve the flag was a lot harder than I expected. I did the flags last year, so I wanted to do something different this time (please excuse the super horrific set of acrylics I'm sporting in that post as I'd just started my nail course and they were the second or third set I'd done). 

For these, I used,
Bright Lights by BYS (yellow)
Snow Me White by Sinful Colors (white)
Black Out by Sally Hansen Xtreme Wear (black)
Shade 17 by BC Company (green)

It was all topped off with a coat of Poshe's Super Fast Drying Top Coat.


To be honest, I don't actually celebrate Australia Day much. I normally go down to the beach with my family and have brunch, but that's the extent of my patriotism. I'm proud to be Australian, but not enough to take all the Aussie paraphernalia seriously (although I take part in some ironically, such as the nails) but I have fun anyway.

Hope all you Aussie's out there have a great day!


Beach Deck Chair Summer Nail Art

Friday, 23 January 2015
No comments :

Hi everyone,

My nails today are definitely one of my favourites that I've done this year. In fact, I think they are my favourites. Which is kind of surprising considering they are a very simple design and involve a fairly pale pink, which I don't generally like very much at all. But, I do love them anyway. And something about them reminds me of summery deck chairs, hence the name. 


I have been all into the matte designs recently, especially mattifying neons and whites. I don't what it is about a matte white, but I really love it. It always looks so crisp and clean and sophisticated. I am also loving my nail shape at the moment. I've always nails that hover between squoval and oval and if you had asked me 3 months ago, I would have told you that I never would change from that shape. But.... I had been admiring the gorgeous nails of @paintedcandynails@secretjewelgarden and @decorateddigits on instagram and decided to take the plunge and drastically alter the shape of my nails. And I love it! 

Pop Art Half Moon Nail Art

Wednesday, 21 January 2015
No comments :

Hi everyone,

I've been on a massive matte design craze recently and this is the first of probably many matte designs that you'll see around here in the near future. I think this was my first attempt at doing a half moon mani, despite it being one of the most popular nail art designs in existence.


I think they turned out all right, although I definitely think I need to either work on my free-handed curves or invest in those little sticky hole things that most nail artists use (although using the sticky things seems far easier and less time-consuming, to be honest). I did love my choice of colours - I always think of pop art when I look at them, with the rich blue and the contrasting orange/pink.

Lightning Nail Art Tutorial

Friday, 16 January 2015
No comments :

Hi lovelies,

As a sort of follow on to my Thor inspired nail art, I thought I would make another tutorial for the lightning nails I did in that design, especially since I've had such a great response to my dream-catcher tutorial.

Also, lightning nails look heaps cool and like galaxy nails, are deceptively easy. So here's my little pictorial for them, and I have to say, I think this is better than my last one. At least I managed to stay on track with this one and I didn't forget that I was meant to be taking photos once! I'm so very proud. I also got my lightbox re-set-up and got myself a good lamp and my photography is (dare I say it) looking to be on the way up!


For this tutorial, you are going to need:
Black polish (I used Black Out by Sally Hansen)
Greenish/blueish polish (I used Sweet Pea by Australis)
Fuchsia polish (I used an unnamed fuchsia by Urban Colours)
Light blue polish (I used Shade 12 by BC Company)
White polish (I used Snow Me White by Sinful Colors)
A top coat (I used Super Fast Drying Top Coat by Poshe)
Fine nail art brush
Sponge (I used a regular make-up sponge that I found in my local $2 shop)

My Holy Grail Nail Products

Thursday, 15 January 2015
No comments :

Hi everyone!

I was talking to one of my friends recently and they were asking me for advice and tips on nail care and nail art and stuff and I realised I hadn't ever put together a nail care post or written properly on my favourite products for my nails. So here's a list of my nail products that have my it to holy grail status for me, and why they have achieved this highly acclaimed status.


Lush Lemony Flutter Cuticle Butter
This is a pretty legendary and well-known cuticle cream throughout the nail blogger world and it's pretty easy to see why. It's thick, nourishing and easy absorbed and moisturises better than any other I've tried. While I know many people, including all of my family, love it's sharp, lemony smell, I have to admit it took a while to grow on me. I hated it when I first bought it (I only bought it because I'd hearing non-stop about it's greatness for ages and thought I had better give it a go) but I've been using it for about a year and I do quite like the smell now. It does have a tendency to melt in the heat (so don't accidentally put it in your beach bag) and when it does melt, it acquires these grainy granules in it. Some people really dislike these, but I like them and the little bit of exfoliation they provide. Anyway, I live in Australia, so it's not like I can keep it under 30 degrees all the time!

It is a little pricey (in my cheap-sake opinion) at AUD$16.50 for a 50g pot, but it really lasts! I've been using mine daily for about a year now and it's not even half empty yet. Purchase it instore at Lush or online.

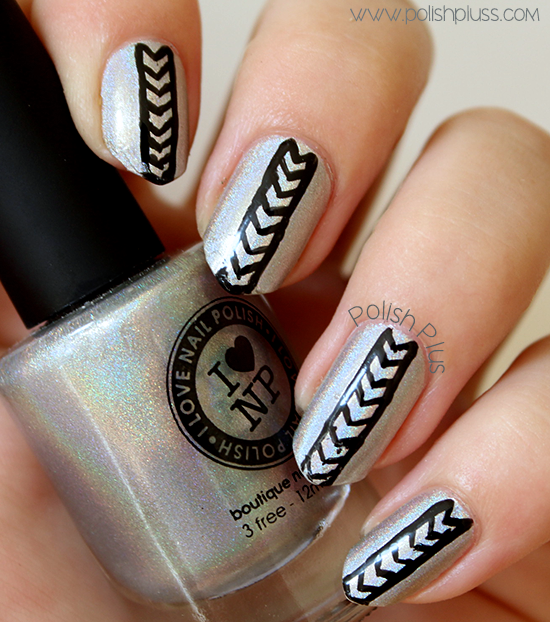
Geometric Chevron Holo Nail Art

Monday, 12 January 2015
No comments :

Hello there!

As you can probably tell by the title for this post, I don't really know how to describe these nails... But I like them anyway.

In the shade
In the shade
I basically just wanted to use MEGA by ILNP. In the shade and inside it doesn't really look like much, but when you take it outside that it really comes to life. It does sparkle a little inside, but it's very subtle and not all that noticeable. But in the sunlight in really, truly glows.

Inspired By: Avengers Assemble - Thor

Friday, 9 January 2015
No comments :

Hi lovelies,

So I've been making a good head start on my New Year's resolutions and done another member of the Avengers as part of my Avengers Assemble series. Today, we have Thor, Norse God of Thunder...


While I was pretty happy with them overall, and very happy with some elements, I do think it could have been done a lot better. I was really quite proud of my lightning bolts and I reckon I've improved since I last tried them. It was just a pity that the pink bled through into the white when I applied my top coat...


Because these aren't the most straightforward 'Inspired By' nails I've done, here's a little run down on what each nail is meant to be.

Dreamcatcher Nail Art +Tutorial!

Saturday, 3 January 2015
2 comments :

Hi everyone!

So I have some more new nails for you today and also, a tutorial! Well, technically, it's a pictorial. I have only just got my photography sort of where I want it so I think it will still be quite a while until I start filming tutorials (if I ever go down that route). I would like to, but I don't know what sort of time I'm going to have next year because I'm starting uni and I know filming and editing take quite a bit of time...

Anyway, back to the nails. These have been sitting around in my 'To post' folder since the middle of November, and I haven't had chance to post them until now. I'm pretty excited to post this, as I feel it's my first real nail art tutorial because all the little pictures are together in one image, as opposed to these galaxy ones and this tape manicure, both of which I did all the way back in 2013.

Also, putting this pictorial together actually took less time than I expected, which makes me more likely to do more of them and also makes me feel so accomplished! :)


So I've been seeing a lot of dream catcher nail art around recently and thought that I'd also try my hand at it. Surprisingly, it was much easier than I thought they were going to be, which is always a plus in my book!

However, if you are wondering why it seems like the pictorial seems to jump a couple of steps/changes focus in steps 1, 2 and 3 it's because I kept forgetting I was meant to be taking pictures of every step.... (I think I need more practice)

New Years Nail Art + Year in Review

Wednesday, 31 December 2014
No comments :

Hi everyone!

So it really is the last day of 2014, which is pretty cool but also pretty crazy. I know that nearly everybody says this, but honestly, if you had told me last year that I would be here right now, I, well, I probably wouldn't have laughed in your face, but I would have at least given you a nervous laugh and found some excuse to leave the conversation immediately.

I loved 2014. I really did. Some bits got a little sucky and I had a rough patch over the middle, but I still loved it. I feel I have accomplished a lot over this year, more so than usual. Mentally, I progressed from being 'in recovery' from my eating disorder to being 'in remission' - which is an amazing accomplishment and I also have come a lot more to terms with my medication and have also developed a much better self help plan for when I do start spiralling downwards (read more about that here and here). In terms of my nails, I feel I have improved quite a bit from the first nail art I did this year to these and I've been particularly proud of some of my more recent ones, like my Tony Stark/Iron Man nails. My photography is still an on going struggle, but hey, nobody's perfect...

I'm proud of how much I've been learning about coding and stuff and I'm loving being able to understand more about how my blog is set up and customise more of it. I'm also really loving my instagram and having more motivation for blogging and stuff. I got qualified as a nail tech and also as a make-up artist and I'm training for my Cert III in childcare and I adore my job in out of school hours childcare.


Anyway, so these nails I am pretty happy with. Considering I was working on a limited time frame and I was also really tired from working all day, I thought these were a pretty good compromise. The fact that I was using such an amazing multichrome as a base also helps make these look 100x better.

Gold Glitter Gradient and Christmas Tree Nail Art

Tuesday, 23 December 2014
No comments :

Hi lovelies,

Today I'm back to red for my Christmas nail art, as well as Christmas trees. I'm feeling a little repetitive this year...


I was pretty happy with how these turned out, although I think I need to work on my glitter gradients a bit. I used just regular craft glitter for this and I have to admit I was a little stumped on how to put it in a gradient. But after a little trial and error, I discovered the best way was just to apply the red polish as normal and when it had dried to a tacky stage, just press the glitter on with my fingers. Of course, this method did mean placement and gradient was left a lot to chance and luck!

Penguins and Snowflake Nail Art AKA Traditional Winter Nail Design

Wednesday, 17 December 2014
1 comment :

Hi lovelies,

After my last Christmas nail design, I am quite happy to be able to tell you that I like how these pictures turned out. It's actually quite frustrating to me how my photography and photo taking skills seem to be fluctuating so much recently... Never mind, that is a problem for another day. Although actually, today's nail's were also a truly frustrating and irritating endeavour and to be honest, if the photos had come out as bad as the holly ones, I wouldn't have bothered editing and posting them. I was so over them.

Although - how cute are these guys??
First of all, I thought my blue background was going to be too dark, so I did a test run with two different blues on paper first. All was good and I did one hand in that colour. Then I started on the penguins. Now, normally when I do my nails I do all of them at once, through different stages, rather than completing one whole nail before moving on to the next one. However, if I'm not sure how well my design is going to transfer from my head on to my nail, I'll do one whole nail first to seen how it goes. But I was totally confident in my ability to paint penguins.

So I did their little white bodies and then the little black insides and the white eyes and then I was like, hold on a minute. Something looks wrong. A quick google of penguins then proved that yes, I was wrong and they actually have black bodies with white insides (tummys? I dunno what to call it). So I had to redo that entire hand (which was my right hand, because I always do my right hand first and let me tell you that my left hand was not thanking me for that).

Holly Berries Nail Art

Thursday, 11 December 2014
1 comment :

Hi there everyone,

Big surprise, I'm back with more Christmas nails, although this time at least they aren't overwhelming red like the other two designs I've done. They just are slightly red, which I think shows that I'm branching out a bit in terms of Christmas colours. :)


These turned out so much better than I was expecting. When I started these, I didn't really have a plan in mind so I was pleasantly surprised when these turned out as well as they did. Also, they did look a lot better in real life - I was once again very frustrated at how the photos of these came out.

Christmas Presents Nail Art

Sunday, 7 December 2014
No comments :

Hi there everyone!

So, I'm a little behind schedule on my Christmas nail art designs for this year, so here's my second one. I had hoped to have many more by this time but then I made the decision to completely overhaul my blog's look and layout and name and everything in December. Nice work Dani. (I probably should have thought about how busy that decision was going to make me before I started). Oh well, live and learn.


To be honest, I'm not that enamoured with these nails. I did them late at night, when I was very sleepy and wanted to go to bed but wanted to have polish on my nails more.